
Introduction
The Kramer Control Brain can be integrated with the KAC-TCH-10 (RX-PAD) MTR controller.
After the integration a Kramer Control tile button configuration to set the k-Control Brain URL, enabling users
to access and use the Brain Web URL for space control.
Prerequisite
- The supported AudioCodes version must be 2.6.228 or higher.
- The supported Kramer Control Brain version must be 2.10.11 or higher.
- The supported Kramer Brain manager version must be 1.0.10 or higher.
- DNS should be supported (preferred).
- AudioCodes IPP tool should be available.
System Setup Steps
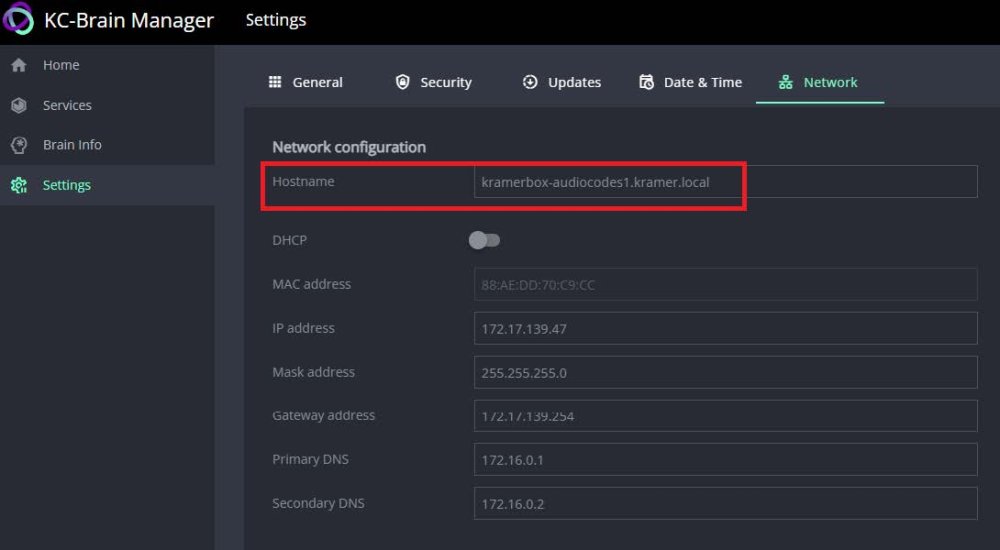
Create a unique hostname for the Kramer Control Brain
- Open the Chrome browser and connect to the Kramer Brain manager using the required IP address
- Navigate to Settings > Network
- Change the hostname to a Fully Qualified Domain Name (FQDN) and click Save
Set Fixed IP for the Kramer Control Brain manager
To accomplish this, the local IT agent should choose one of the following options:
- Reserve the assigned IP to the MAC address provided by the DHCP server.
- Set a static IP address for the brain and ensure that this IP is reserved as static.
![]()
Create the certificates
- Ensure the new hostname is registered in the DNS.
- Generate a certificate with the FQDN (hostname.domain.local) as the common name, and add Subject
- Alternate Names (SANs) as follows:
- DNS.0 = hostname.domain.local
- DNS.l = hostname
- DNS.2 = xxx.xxx.xxx.xxx
- Convert the certificate and key to PEM format
- The file uploaded to the Brain must be a single bundle containing the device certificate and the CA/Chain certificate
- From the PEM file copy the CA section and create a CRT file for the KAC-TCH-10 (RX-PAD) with the copied section
Load the certificate to Kramer control brain
- Navigate to Settings > Security
- Upload the certificate which must include full chain to the AudioCodes device.
- Save & Reboot Kramer Manager
![]()

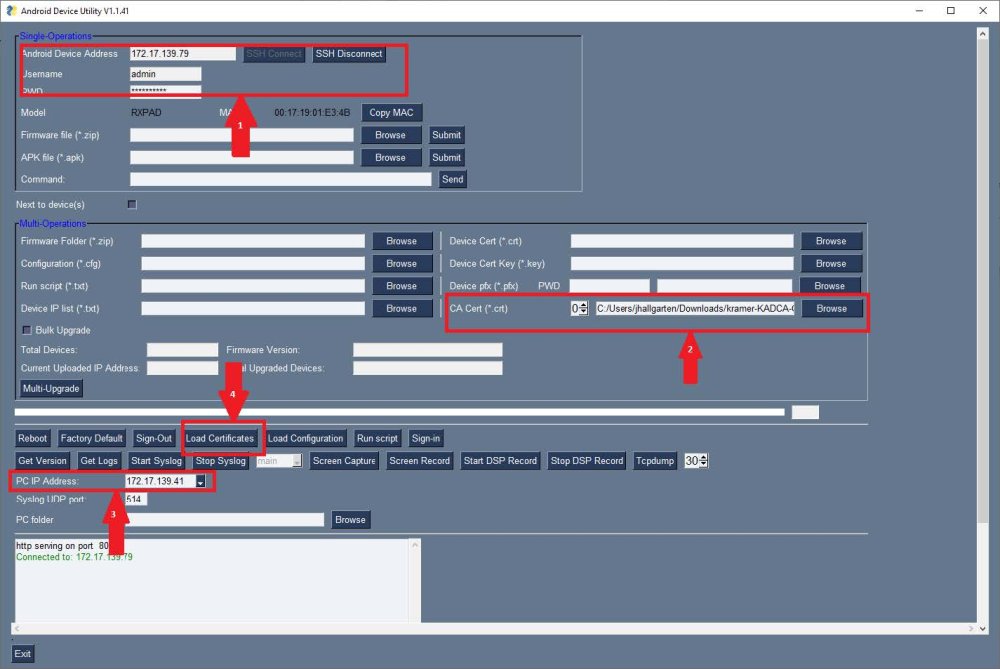
Load the certificate to the KAC-TCH-10 (RX-PAD) MTR controller
- Enable the SSH on the KAC-TCH-10 (Devise Setting > Debugging > SSH > Enable)
- Open the IPP utility and connect to the KAC TCH-10
- SSH connect to the device (step l below)
- Browse to the certificate and insert (step 2 below)
- If you have multiple network cards on your computer, verify that you choose the PC IP Address of the same network as the KAC-TCH-10 (RX-PAD) (step 3 below)
- Click on Load certification, to load the crt file to the RXPAD (step 4 below)
- Verify the load by SSH on the KAC-TCH-10 (RX-PAD) (logcat I grep -i certsinstall)
![]()
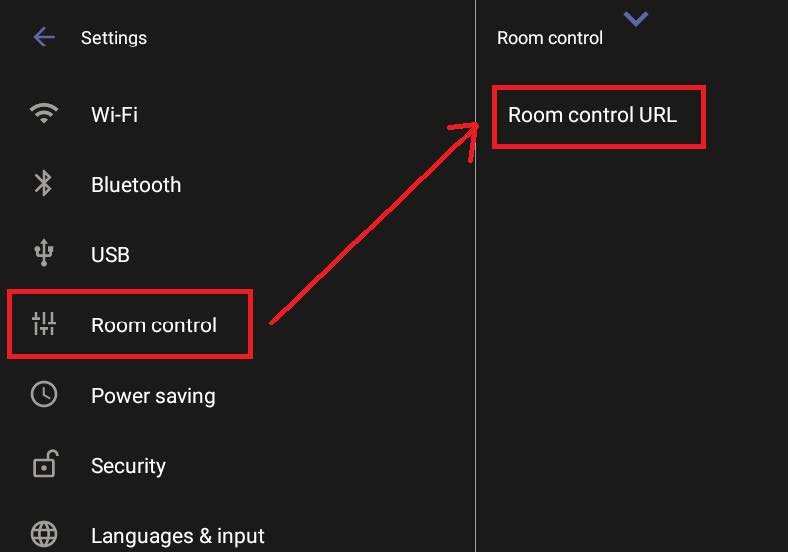
Setup the Kramer control URL on the KAC-TCH-10 (RX-PAD)
- In the RXPAD: Settings> Device settings> Room control >Room control URL
![]()
- Insert the URL with port 9000 and click ok for example: https://cs-l.kramer.loca/:9000
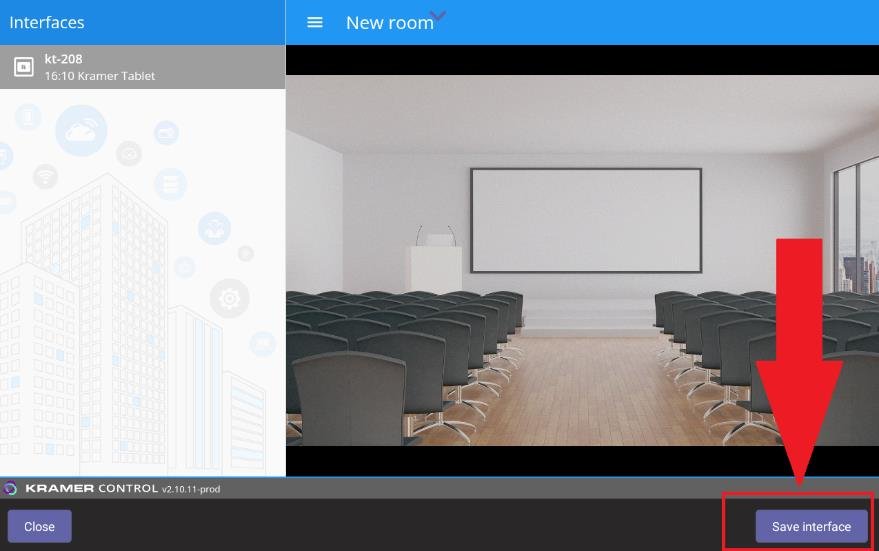
- In the control interface navigate to the relevant control page and click “Save Interface”
![]()
- To work with an IP address and not with the DNS run the command below on ssh:
param_tool scp system/ room_control/ security/ ssl_id_mismacth_error IGNORE - To work with the DNS (this is the default) if done the above can be changed back with the command
below in SSH: param_tool scp system/ room_control/ security/ ssl_id_mismacth_error DISALLOW - To kill the ROOM CONTROL process from SSH to the RXPAD: am force-stop
com.audiocodes.room_control
Activating the Kramer control from the KAC-TCH-10 (RX-PAD)
- Click the curser to open the application window:
![]()
- Click the Kramer control icon:
![]()

- To move back to the MTR controller click the O button on the bottom of the touch panel.
Feedback
Copyright © 2025 Kramer
—
Powered by 
Post your comment on this topic.