
| |
This is the Timeline Toggle icon. |
| |
This is the Export icon. |
 |
This is the Range Selector. |
If you need a chance to narrow and review the video that you are exporting, this export option is your best bet. This option involves two basic steps: selecting the video, and exporting the video.
- First, be sure that the Players you need are on the Stage.
- Use the Calendar Picker, if needed, to focus your search around a certain date and time.
- Click the Timeline Toggle icon to expand the Timeline Bar. There will now be two timelines you can use to identify and select the video you want to export.
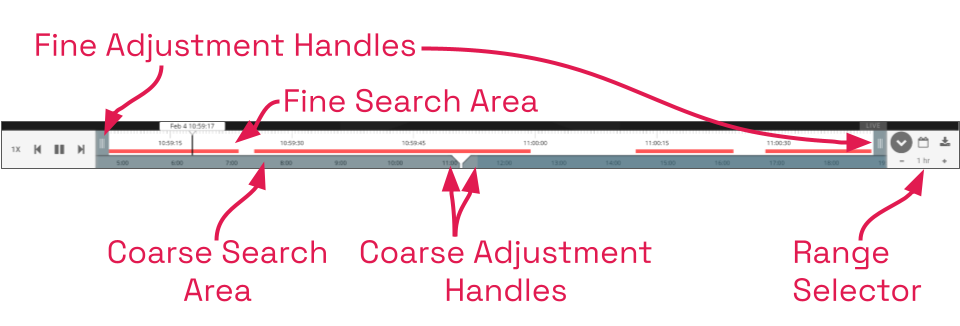
The bottom timeline represents the Coarse Search Area which displays a broad range of time. The top timeline represents the Fine Search Area which is used to pinpoint a specific range of time within the Coarse Search Area. Once that specific range is defined, all of the linked Players will play the selected video in a loop for review.
- Use the Range Selector to increase and decrease the Timeline Bar increments and amount of time displayed in the Coarse Search Area.
- Click and drag the Coarse Adjustment Handles to narrow the video search area. The area between the handles represents the narrowed search area (which is now reflected in the Fine Search Area).
- Click and drag the Fine Adjustment Handles to further narrow the search and finalize the video selection for export. Review the final loop as needed. (The default maximum amount of video you can select for export is 1 hour.)
- Once you have selected video, click the Export icon to open the Save Video screen.
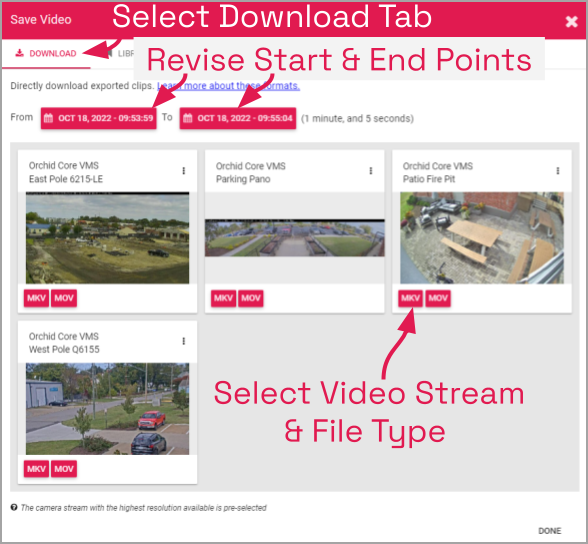
- Select the Download tab.
- You may use the Calendar buttons to revise your start and end dates/times, if needed.
- The Save Video screen will display a thumbnail representing each of the Players that were on the Stage. Decide which Player you want to export.
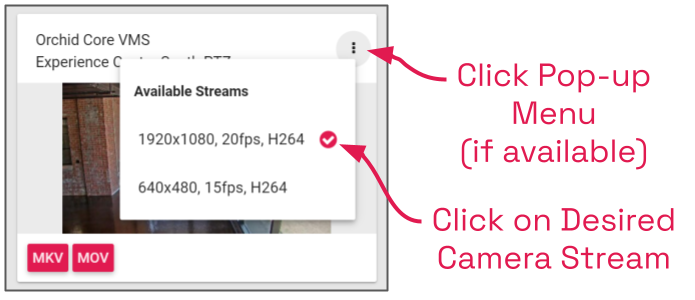
- If the Player has a pop-up menu, you may use this to select a specific stream for the export. (This menu will only be available if multiple recording streams have been configured by the Administrator.)
- Click on the pop-up menu, then click on the stream resolution you want to export. (If you don’t select anything, the system will automatically select the highest resolution stream for the export.)
- Now click on the file type you want to export. Orchid Fusion/Hybrid VMS supports the MKV, MOV, and Dewarp video file types (as explained earlier). Once you select a file type, Orchid Fusion/Hybrid VMS will begin downloading the video.
- Notice that the Save Video screen is still open. If there were multiple Players on the Stage when you selected the video, you may export video from other Players from the same time period. (Follow steps 10 through 12.)
- Press the Done button when you are done exporting this selection of video.

Post your comment on this topic.