
The Sygic app will calculate your route when you tap “Get directions” button, after choosing your destination (see Choosing the destination).
Before you begin navigating, there are a few options to customize and review your route.
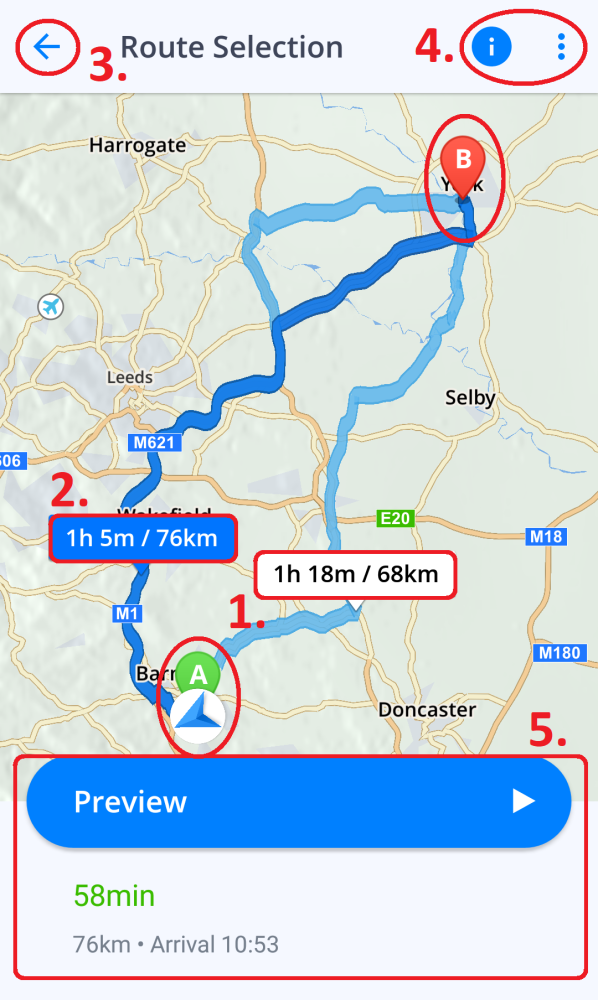
This picture shows the route selection screen. It contains several options and information:
1. On the map you can see between one and three route suggestions that have been found, with brief information about them (distance and estimated time) in the little frame. The green “A” marker is the start of the route and red marker “B” is the destination.
2.*The route recommended by the app is distinguished by a darker blue color. You can choose a different route if more than one was offered, by tapping on either the route itself or its information frame.
3. In the top left corner, you can cancel the route selection and get back to map browsing by tapping the arrow icon.
4. In the top right corner, you can open a detailed information screen about the route by tapping the “i” icon. More info about this screen is in the next paragraph. Also in the top right corner is the three dots icon. Tap it to switch between walking/driving mode, or change the starting point of the route.
5. At the bottom of the screen, you can find a little more information about the currently chosen route and a “Start” button, which will start navigating. If your route has a starting point different to your current location, the “Start” button will be called “Preview”.
Route Information screen
You can access the information screen by tapping the “i” icon in the top right corner of the route selection screen. You can also access the information screen while navigating by opening the Quick menu and choosing the Route Info option. For more details about the Quick menu, please refer to Quick menu section.
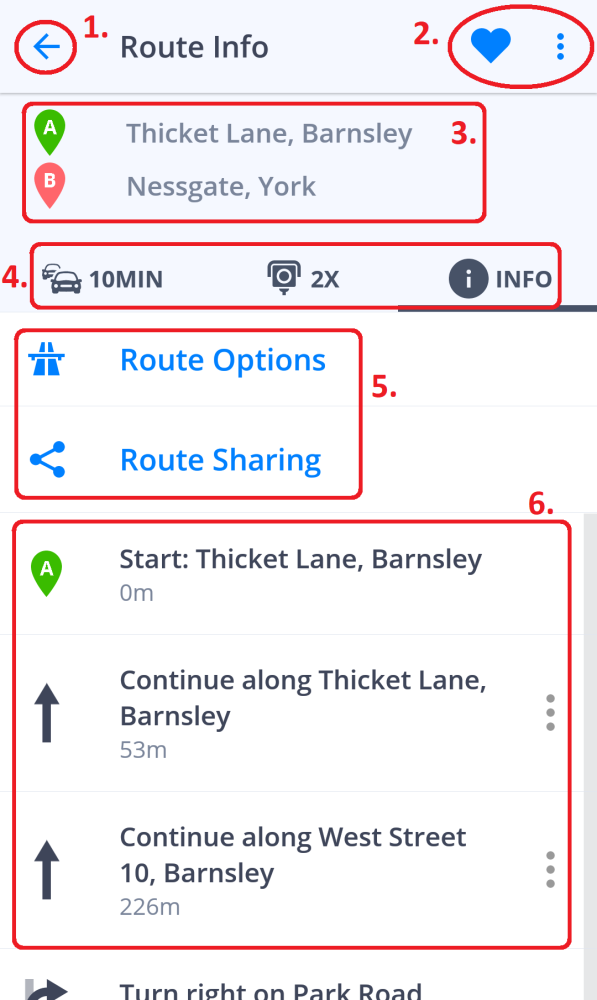
You can find various useful information about the selected route on this screen.
1. In the top left corner, you can return to the previous screen by tapping the arrow icon.
2. In the top right corner, you can add the route to your favorites by tapping the heart icon. By tapping the three dots icon, you can enter the route preview. In route preview mode, you can simulate navigation mode while standing still (you can also increase the preview speed to fast forward).
3. In the top part of the screen, your starting point and destination are listed as well as any waypoints along the way, if any have been selected.
4. Right under the starting/destination points, there is a line with three tabs that will affect the information provided in the lower half of the screen:
- Traffic – tab will show any important traffic information relevant to your chosen route such as traffic jams, accidents, roadblocks. Please note that this tab is active only if you have purchased the Premium+Traffic license or Traffic add-on.
- Speed cameras – in this tab there will be all known speed camera locations along the route.
5. Under those tabs, there are two other features to select:
- Route options will let you avoid certain road types, like toll roads, highways, unpaved roads, etc., separately for each country that the route is going through.
- Route Sharing will allow others to view your position on the route, by sharing it via Glympse.
6. Info – shows a list of all turn directions for the entire route.
After you have checked all the information, picked your route and/or customized it, you start the route by tapping the big blue “Start” button located in the bottom of the route selection screen.
Besoin d'aide supplémentaire avec ce sujet?
N’hésitez pas à nous contacter ici.