
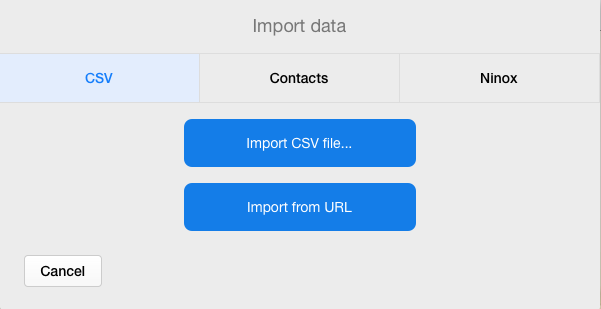
The import of a CSV (Comma Separated Values) file consists of the following steps:
1. On the “Import Data” screen (see above), click on the [Import CSV File…] button
2. When the file selector window appears, navigate to and select the file that is the CSV content source file and click the [Open] or [Select] button
3. On the “Data Source Settings” screen (see below), select ASCII as the Character Set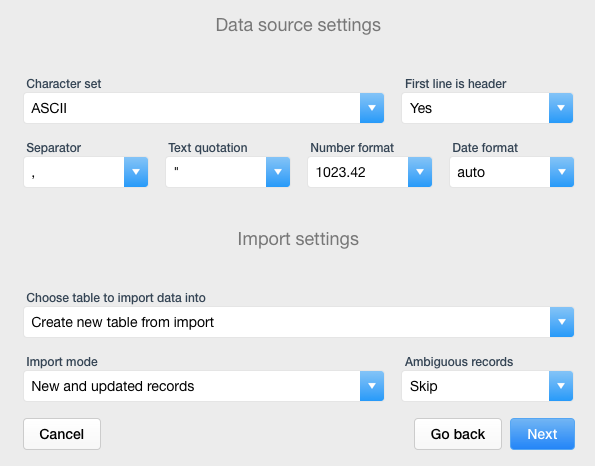
4. Indicate whether the first line (record) in the source file is a header record containing column name labels. If the first line (record) in the source file does not consist of column name labels, select “No” in the “First Line is Header” field
5. Indicate the character that is used as the separator in the source data file. In spite of the name COMMA separated values, the separator may, in fact, be a comma (,), semi-colon (;), bar (|) or a tab stop. A tab-stop delimited source is also referred to as a Fixed-Length source table where the contents of each field is exactly the same length across all records thereby enabling Ninox to define each data field according to it’s numeric position in the record
6. Indicate whether quotations in the source data table are enclosed in single (‘) or double (") quotation marks
7. Indicate whether or not the content being imported is to be inserted directly into an existing Ninox table by selecting one of the tables in the drop-down listing or if the new content is to be inserted into a new table, the structure (data model) of which to be based on the structure of the import file.
8. If content being imported is to be inserted directly into an existing Ninox table, indicate whether all records in the source file are to be inserted, whether only records that exist in the source table but not in the destination table are to be inserted (Only New Records), or if content in the source table is to be merged with existing content in the destination table (Only Updated Records). If you choose “Only Updated Records”, Ninox will compare the record in the source file to the apparent matching record in the destination table and change the field content of the destination table record according to the field contents of the record in the source table. If the comparison of the records in the CSV source file and Ninox destination table does not provide a clear delineation between “old” and “new” content, use the “Ambiguous Records” field to indicate whether the record in question should be skipped or should all fields in the record in the destination table be updated to match the content of the source file record.
9. Click the [Next] button that appears in the bottom, right-hand corner of the “Data Source Settings” screen
10. The next screen you see will be the “Field Mapping” screen (see below)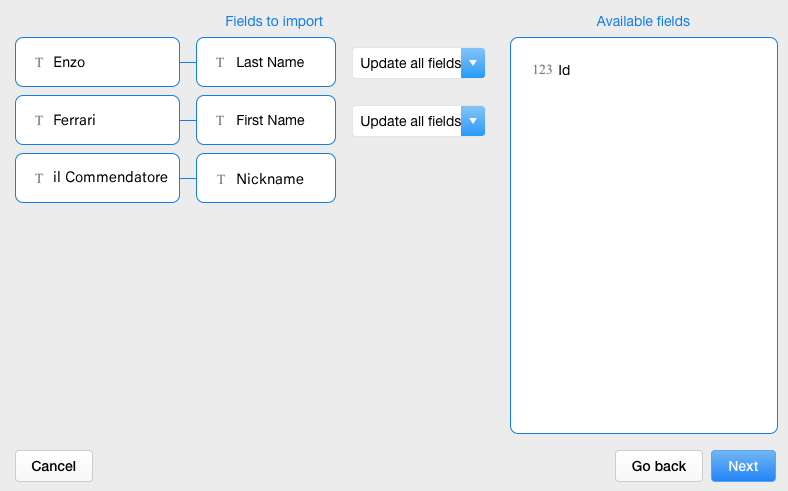
In this screen, you will indicate to Ninox how the fields in the source file map to the fields in the destination table. All of the fields in the destination table will appear in the “Available Fields” window on the right side of this screen, while the fields in the source file will be indicated by the values (content) in the first line (record) of the source table in the “Fields to Import” section on the left-hand side of the screen. To map the fields, drag the Available Fields to the blank boxes next to the source table fields to indicate where, in the destination table data model, the source content should go. Next to each line in the map, you will have the option to indicate whether all fields or only empty fields in the source table record should be updated.
11. When the “Preview Changes” screen appears, review the proposed import, based on the mapping defined previously, to confirm that the source data is ending up in the correct field in the destination table. If the mapping is correct, click the [Import Now] button that appears in the bottom, right-hand corner of the screen to execute the import. If the mapping appears incorrect, click [Go Back] to return to the mapping screen or [Cancel] to abandon the import process entirely. Note that once you click [Import Now] that the import operation will be executed and can not be undone once completed so it is advised that you make a backup of your entire database application prior to executing any data import operation.
Potřebujete pomoci ?
Nestyďte se nás kontaktovat zde.