
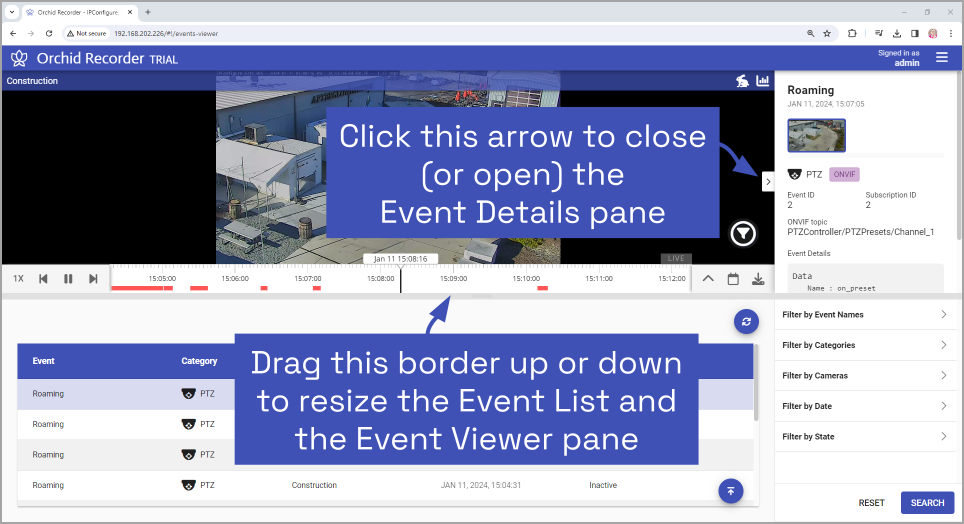
The Events screen is comprised of three main sections: the Event List, the Event Viewer, and the Event Details pane. You’ll use the Event List to select an event, the Event Viewer to view the video (if any) associated with the event, and the Event Details pane to view specific event information or to switch cameras (if multiple cameras are available).

The Event Viewer and the Event List sections are resizable.
- Click on the border between these sections to resize them.
- Drag the border up to increase the size of the Event List pane.
- Drag the border down to increase the size of the Event Viewer pane.
The Event Details pane may be displayed or hidden.
- Click on the arrow button to open or close the Event Details pane.
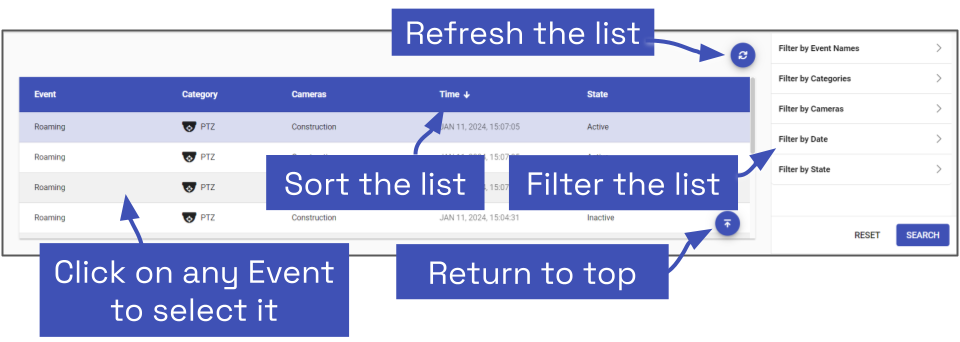
The Event List
| |
Click this icon to update/refresh the Event List (A badge will indicate when new events have occurred) |
| |
Click this icon to return to the top of the Event List |
| |
Click this arrow icon to re-order the Event List by the date and time of the events (newest to oldest, or oldest to newest) |
The Event List displays each occurrence of any event defined by the Administrator. For each event, the system provides the event name, category, associated cameras (if any), the date and time of the event, and the active/inactive status.
- Use the scrollbar on the far right side to scroll up and down through the list.
- Click on any event to access it.
- If one or more cameras are associated with this event, video will appear in the Event Viewer pane.
- Event details will appear in the Event Details pane (in the upper right corner of the screen). (If the Event Details pane is not open, click the left arrow icon at the right edge of the Event Viewer pane.)
- To refresh the list (with the most current events), click the Refresh icon. (A badge will indicate when new events have occurred, thus prompting you to refresh the list.)
- To return to the top of the event list, click the Return to Top icon.
Sorting the Event List
You can sort the Event List by the time of the event, so you can start your review with the latest events or the oldest events.
- To sort the list, click the arrow icon at the top of the Time column.
- Each time you click the icon, the sort order will switch between ascending and descending.
Filtering the Event List
The Event List may be filtered to display only the events that you specify. You may filter the list using any one or more of the Event List headers. These include the event name, camera name, state, category, or date.
- To filter the Event List, use any of the Filter selections along the right side of the screen.
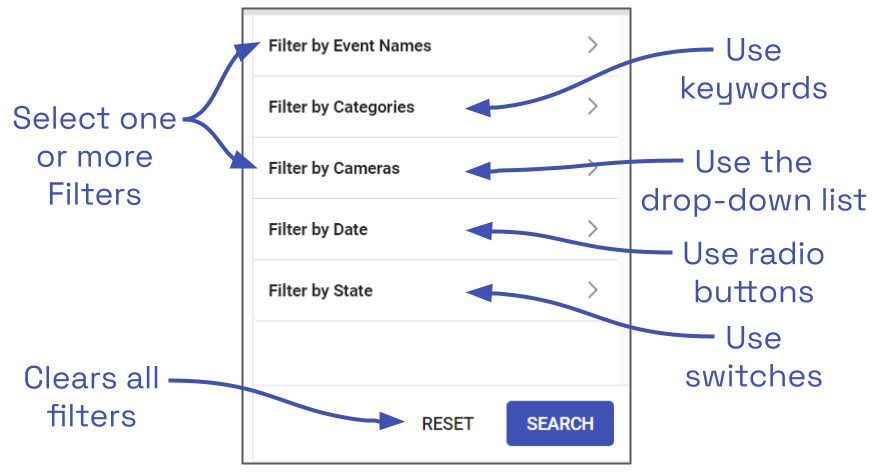
- To filter the list by event name or camera name:
- Click on the appropriate Filter by… heading to expand it.
- Type a keyword that represents the event or camera you want to see, then press Enter. (You may select more than one.)
- Click the Search button to apply the filter and review the results.
- To filter the list by category:
- Click on the Filter by Categories heading to expand it.
- Then click on the Categories drop-down list.
- Mark the checkboxes that correspond to the items that you want to view.
- Un-mark the items that you don’t want to view.
- Click the Search button to exit the list.
- Click the Search button to apply the filter and review the results.
- To filter the list by date:
- Click on the Filter by Date heading to expand it.
- Click on one of the radio buttons to choose a date filter. Pre-defined date filters include the Last hour, Last 12 hours, and the Last 24 hours.
- You may enter a custom date filter by selecting the From/To radio button.
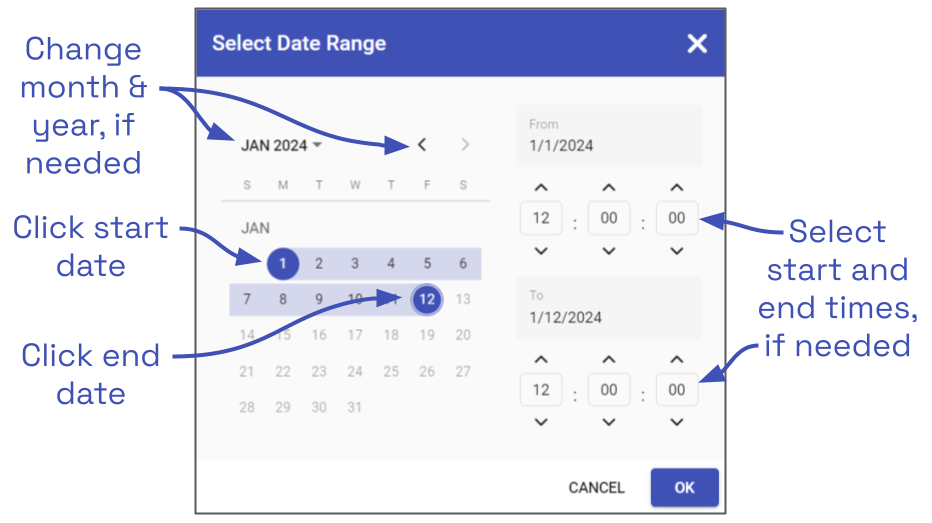
- Then use the Select Date Range screen to select the start and end times for the filter.
- Click OK, when done.
- Click on the All radio button to essentially clear the time filter.
- Click the Search button to apply the filter and review the results.
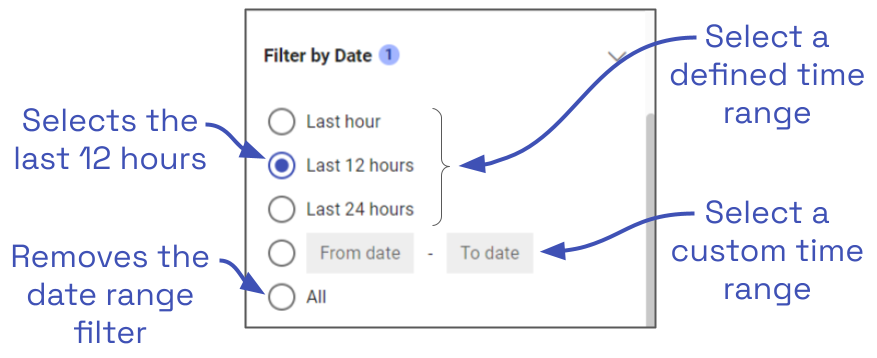
If you select a custom time range, you’ll use the screen below to refine the date and time.
- To filter the list by state:
- Click on the Filter by State heading to expand it.
- Then click on one or more switches to turn state filters on and off. When the switches are on, the Events list will display those events that match the selected state(s).
- Click the Search button to apply the filter and review the results.
- To clear all filters, click the Reset button.
- Click the Search button to view the updated list.
The Event Viewer
| |
Click this icon to open the Event Details pane |
| |
Click this icon to close the Event Details pane |
The Event Viewer pane allows you to view video from any cameras that are associated with the event, one Player at a time.
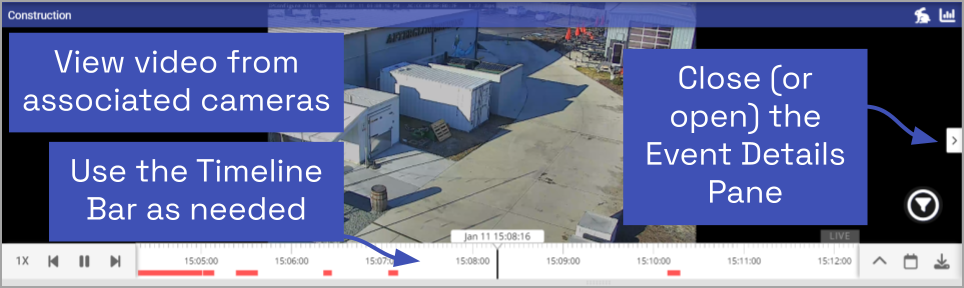
When you select an event from the Event List, video from that specific date and time will appear in the Event Viewer (if associated cameras were selected). The Timeline Bar and viewing controls should all be functional, so you can use the Event Viewer pane much like you use the main Stage screen. Refer back to the Timeline Bar Overview, Viewing Video, and Exporting Video sections for more details.
From the Event Viewer, you can open and close the Event Details pane.
- Click the left arrow icon to open the Event Details pane.
- Click the right arrow icon to close the Event Details pane.
The Event Details Pane
The Event Details pane allows you to view the details associated with the event.
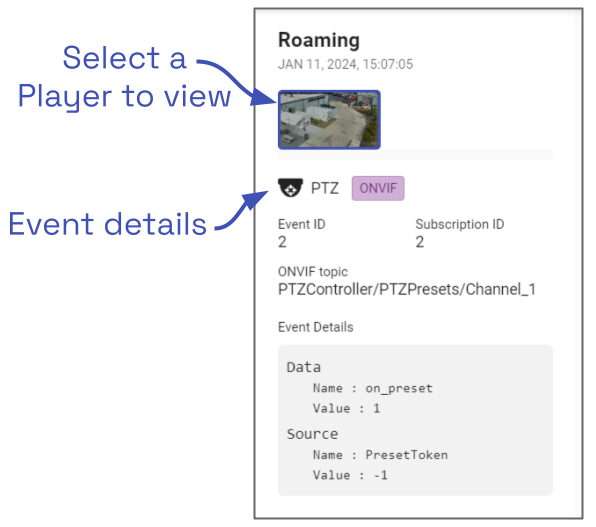
When you select an event from the Event List, the details pane will be updated with all of the related information. The details pane will show the event name, a thumbnail from each of the associated cameras (if any), the category, the event type, and the details about the input that triggered the event (if available).
- To open (or close) the Event Details pane, use the tab on the right edge of the Event Viewer pane.
- Click on any available thumbnail to display it in the Event Viewer pane. (When you switch Players, the Timeline Bar will return to the start time of the event.)
Post your comment on this topic.