
Projectors in SHAPE emulate projectors in the real world. Analysis tools can be used to find the ideal projector locations and angles to aid the pre-production team in planning. Projectors can also be patched to real world projectors, they can be aligned, warped, masked and blended.
To Add a Projector goto:
 Menu Bar, Create, Projector (Alt+P)
In the Scene hierarchy panel projectors have icons for, blend, show/hide output, colour, visible in scene and lock.

![]() Blend: Toggles blend on/off
Blend: Toggles blend on/off![]() Show Output: Toggles projector output on/off
Show Output: Toggles projector output on/off- Colour: Choose a colour to visualise the projector wireframe and coverage.
![]() Eye: Toggles the visibility of the projector in the scene
Eye: Toggles the visibility of the projector in the scene![]() Lock: Locks all properties to stop unwanted or accidental changes.
Lock: Locks all properties to stop unwanted or accidental changes.
 Blend: Toggles blend on/off
 Show Output: Toggles projector output on/off
 Eye: Toggles the visibility of the projector in the scene
 Lock: Locks all properties to stop unwanted or accidental changes.
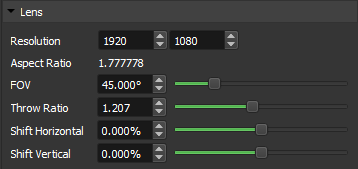
Lens
- FOV: In SHAPE, field of view (FOV) is a term used to calculate the angle of the projectors view. It is measured horizontally in degrees. You will notice if you change the FOV the Throw Ratio will change, this is because they are directly related.
- Throw Ratio: Throw Ratio refers to the ratio of the distance to the model to the width of the projected image. The larger the number the tighter the angle.
- Aspect Ratio: The aspect ratio of an image describes the proportional relationship between its width and height.
- Shift Horizontal: Changes the Horizontal Lens Shift.
- Shift Vertical: Changes the Vertical Lens Shift.
- Dynamic Clipping Planes: With this enabled, Clipping Planes, Near and Far will automatically set themselves.
- Near: This sets the closest plane projectors will begin to render.
- Far: This sets the furthest plane projectors will stop to render within.
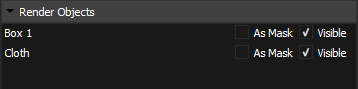
Render Objects
This panel lets you decide if you want objects to
- Visible: Make the object visible in the scene
- As Mask: Make the object render black essentially creating a 3D mask.
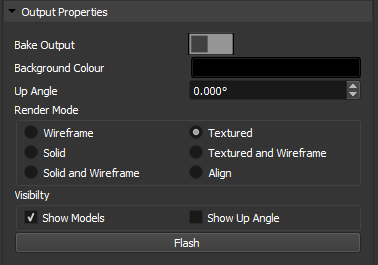
Output Properties
- Bake Scene: Bakes the scene from the point of view of the projector into a texture.
It allows faster rendering when a large amount of vertices is visible from the projector.
It should not be used with dynamic objects (controllers etc), as it will need to rebake every frame and will slow down. - Background Colour: Change the background colour to add a little light to the scene or make it obvious as to what projector is hitting what part of the model.
- Up Angle: Sometimes projectors are rigged at angles to increase pixel density on real world surfaces. If your projector is rigged at an angle cursor keys in warp, mask and blend, will not act as expected. If you adjust the up angle so the arrow on the output points up the cursor keys will now act with the real worlds up and down and not with the projectors up.
Render Modes
Each projector can have different render modes. Textured will show video content from the Hippotizer.
 |
 |
 |
 |
 |
 |
Statistics
- Models: Number of models the projector can see and is rendering.
- Vertexes: Number of Vertexes the projector can see and is rendering.
- Faces: Number of Faces the projector can see and is rendering.
Visibility
- Show Output: Toggles the projectors output.
- Show Controllers: Toggles visibility of controllers paths on the output
- Show Up Angle: Toggles an arrow representing Up. Useful for use with warping, masking and blending. The cursor keys work with the up angle.
- Show Grid: Toggles the scene grid on your output.
- Show Selected Vertices: Toggles visibility of selected vertexes on the output.
- Flash: Hold to project a bright colour out the projector, often you are working in the dark and just need to see whats going on! Flash (Shortcut F)
In Toolbar Edit, Preferences, Project Settings you have flash options. Hide models on flash and flash colour.