
By checking “BPMS AdminConsole” in the next step, the “Admin Console Configuration” form will load to set the details of the installation for this module.
Note: This module contains all of the designer (form designer, entity designer, rule designer, etc.) tools to build and or manage BPM applications.
Note: Updating and installing this module is mandatory

1. Use Existing Web Application

By choosing this option, the installation/update is performed on the existing web application on the system.
Note: This option is the default mode when the modules are updated.
2. Create New Web Application

By choosing this option and then defining the web application profile, the web application is created with the insert name.
3. Physical Folder

The physical path of the web folder.
4. URL

Note: Users can change the path after installation of the application by going into Application Settings in Admin Console.

5. Physical Folder

By choosing this option, the installation files are placed into the IIS physical path
6. Local Website

The website defined is included in this box
7. Application Name

The web application name is entered in this box.
8. Lock Server

The name or IP of the server where the hardware locks are located.
9. SSO Setting
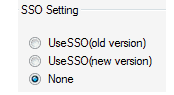
An SSO is a called service that provides a secure connection between the BPMS system (ARPG & Eoffice plugins).
- Use SSO-old version: Connect with the old SSO version.
- Use SSO-New version: Connect to the new SSO version.
- None: No connection to SSO.
10. User Name

The name or IP of the mail server and its port number.
11. Password and Username

The user name and admin password.
12. Default Email

The default email is included in this box.
13. Enable SSL

Enable authentication or SSL
14. Default User and E-Office URL

The default user name and password for E-Office notifications