
After Importing 3D models they will be available in the Media panel. These can then be added to composite shot timelines like any other media asset.
Using Multiple 3D Models
3D models can exist on their own individual layers, or within a single 3D model layer. When dragging a new model to the timeline from the Media panel, you can choose to drop it onto the timeline as a new layer, or on top of an existing 3D model layer.
If a 3D model layer contains multiple models, they are listed individually inside the Models group.
See Working With Layers for information on more generic model layers.
World Transform
These transform controls move the entire 3D scene contained within the 3D layer. All 3D models inside the 3D layer will be affected.
Material
Fine control is provided over how the 3D model layer is affected by lighting. These settings affect the entire layer. If you want to adjust individual materials within the model, see Setting Up Materials.
Illumination and Shadows
- Illuminated: Controls whether the 3D model layer is affected by 3D lights. The way a model reacts to lights can be adjusted when Setting up Materials.
- Receive Shadows: A model can be set to receive shadows. These shadows will only be cast from layers which have Cast Shadows activated. This includes the selected model, which will only self-shadow and cast shadows with both options enabled.
- Cast Shadows: Enable this option to allow the layer to cast shadows into other layers.
- Cast Shadows If Visibility Is Off: Allows the layer to cast shadows even when the layer’s visibility is turned off. This makes it easier to create a shadow pass, in which you can cast shadows onto a white background for further compositing purposes, such as blending the shadow pass into live action footage.
- Self Shadow Bias: Used to restrict how much of the model casts shadows onto itself. Some models produce shadows where there should be none, and this helps to remove unwanted glitches. Raising it too high will cause unrealistic results.
Reflections
Similar to shadows, you can also control exactly how reflections are generated. Reflections are generated dynamically and will combine with the environment map, if one is being used.
When a model is set to receive reflections, it will obey the reflection settings defined in the 3D model’s Properties.
- Receives Reflections: Allows the model to receive reflections from any other 3D layers set to cast reflections.
- Cast Reflections: Allows the model layer to cast reflections onto other 3D model layers.
- Cast Reflections If Visibility Is Off: Allows the layer to cast reflections, even when the layer’s visibility is turned off.
Environment Map
An Environment Map can be used for reflections and refraction. This is a single layer, usually a wraparound panoramic image of a location which is representative of the desired reflections. An environment map can be used on its own, or in combination with the real-time reflections.
- Environment Map: Choose the source which will be used as an environment map.
- None: No environment map will be used.
- Use Composite Shot: A flattened version of the entire contents of the current composite shot will be used to generate an environment map.
- Use Layer: Allows you to choose a single layer from the current timeline, which will be used as the environment map.
- Layer: When Use Layer is selected, a new property will appear, where you can select the layer you wish to use from a menu of all layers in the current composite shot.
Ambient Occlusion
Models can self-shade based on proximity of surfaces to other surfaces. This replicates the reduction of light that occurs where surfaces meet in the real world (this can be observed by the naked eye in the corners of rooms).
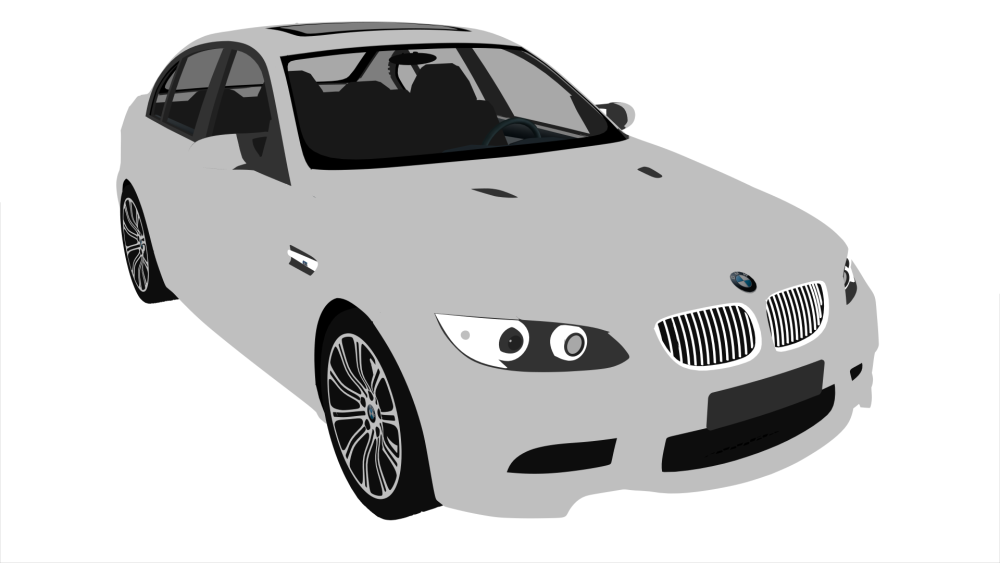
Compare this image without ambient occlusion:
With this image showing ambient occlusion on the vehicle:
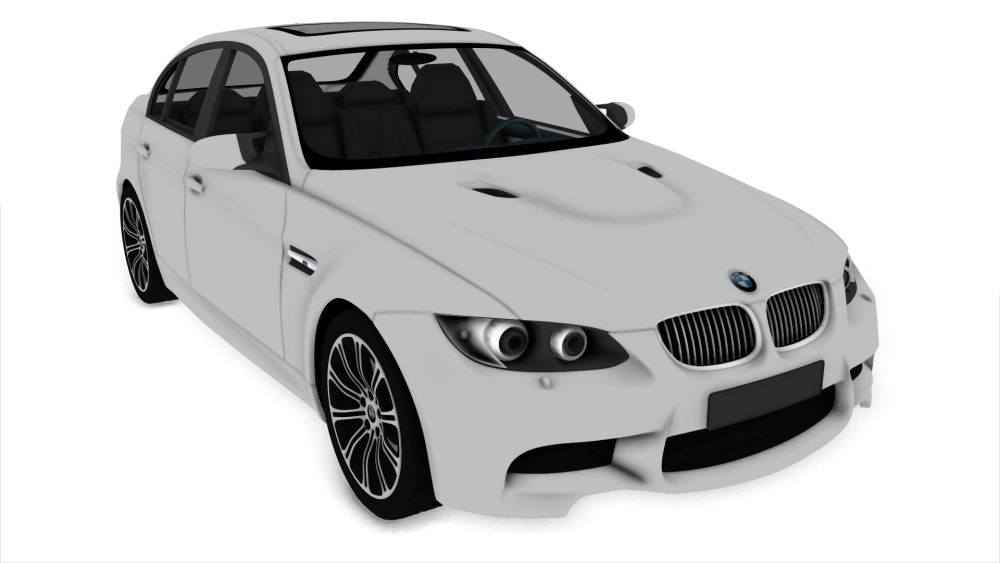
The ambient occlusion in the second image highlights detail by shading areas where different surfaces are in close proximity. There is also subtle ambient occlusion being cast onto the white floor around the wheels. Ambient occlusion can then be combined with illumination and shadows cast from actual 3D lights.
- Receives Ambient Occlusion: Enabling this option allows the model to receive ambient occlusion from itself or other nearby layers.
- Casts Ambient Occlusion: Enabling this option allows the model to cast ambient occlusion into itself or other nearby layers.
Once ambient occlusion is activated, additional options are displayed for customizing the appearance of the occlusion.
The Depth Scale can be used to adjust the appearance of ambient occlusion for different scale models.
If you experience visual glitching with some models, try increasing the Blur Radius or Samples.
Include Semi-Transparent Triangles applies ambient occlusion to materials containing transparency, or using 32-bit textures.
Models
Each model in a layer will be listed in this property group and can be transformed individually.
If animation groups were selected during importing the model these will be listed as sub-models within the relevant model with their own transform properties.
The Anchor Point Orientation property determines the orientation of the model group’s coordinate system. This is useful for setting up correct rotation of particular animation groups, such as the rotor blades on a helicopter.
The Animations section can be used to apply Alembic animation data. See Alembic Animation for details.