
To accept payments for a photo booth running Breeze Remote Pro you need to run the MDB Payment utility and Breeze RemotePro on the same computer.
In Breeze RemotePro’s “Photobooth Settings” dialog set “Start options” to “Touchscreen” so that it can accept commands from the MDB Payment Utility.
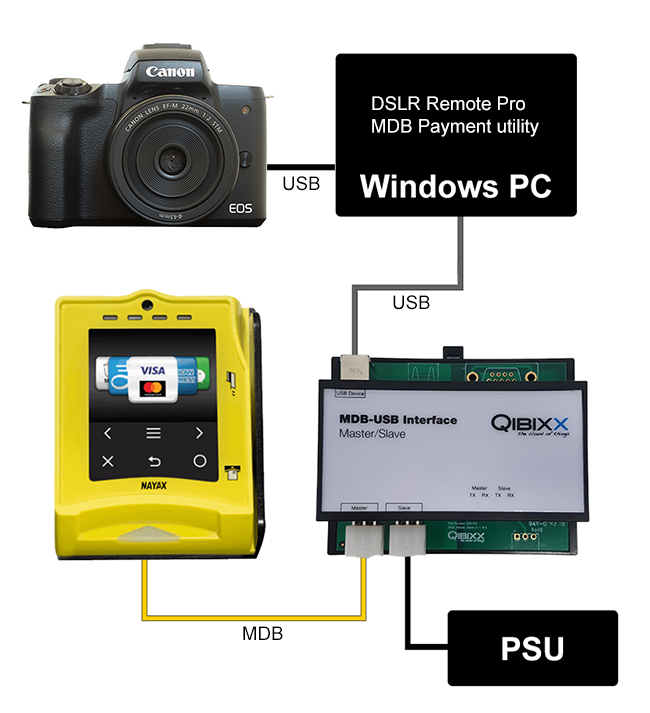
The MDB Payment utility controls the photo booth by sending touchscreen commands to Breeze RemotePro and communicates with the payment system via the MDB-USB interface.
Typical Setup
A typical payment system for a Windows based photo booth running Breeze Remote Pro is shown below:
Authorization First Examples
When the card reader is set to authorization first the session is initiated by the user scanning their credit card then the photo booth requests the payment and waits for it to be authorized before starting the countdown.
Photo Booth Authorization First Example 1
In this example the photo booth displays a welcome screen and waits for the user to scan their credit card and then automatically starts the photo booth when the payment has been authorized.
Photo Booth Authorization First Example 2
In this example the photo booth takes the photos and then asks for payment in the print confirmation screen. When the print confirmation screen is displayed it waits for the user to scan their credit card and then prints the photos when the payment has been authorized.
Photo Booth Authorization First Example 3
In this example the photo booth takes the photos and displays the sharing screen with options to share the photos for free or to pay per print.
Selection First Examples
When the card reader is set to selection first the user selects the service they require from the photo booth and it requests a payment from the card reader. The card reader displays the amount requested and asks the user to scan their credit card. When the payment is authorized the countdown is started.
Photo Booth Selection First Example 1
In this example the photo booth displays a welcome screen and waits for the user to tap the screen to switch to the ready screen. When the ready screen is displayed a payment request is sent to the card reader which displays the amount and invites the user to make a payment. When the payment is authorized the photo booth countdown is started.
Photo Booth Selection First Example 2
In this example the photo booth takes the photos and displays the sharing screen with options to share the photos for free or to pay per print. When the user taps the print button in the sharing screen the photo booth requests payment. The card reader displays the amount requested and asks the user to scan their credit card. When the payment is authorized the photos are printed and the photo booth returns to the sharing screen.