
Overview
This section provides a more detailed guide to the functionality available for notifications.
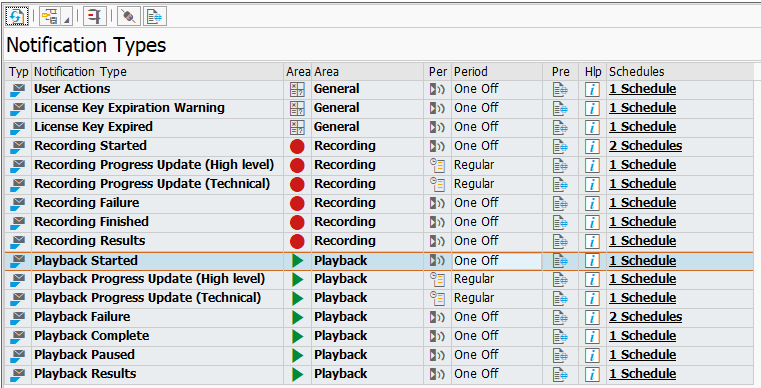
Notification Types
The Notification Types are displayed as below. Each one has the following fields:
- Area is the part of Testimony that this Notification Type relates to.
- Period can be a one off notification sent each time that action is triggered or regular notifications occurring throughout the recording or playback at periods determined by the schedule.
- Clicking on Pre shows a preview of the notification that is sent out.
- Clicking on the information button under Help provides details on each Notification Type if further clarity is required on when it might get triggered.
- Schedules shows how many schedules have been set up for that Notification Type. Note that each Notification Type will have a standard Notification Schedule provided as a template to copy. A double click displays the schedules set up under this type.
The Notification setup has the following actions:
Refresh 
This allows a simple refresh of the grid to update any changes.
Grid Tools 
The grid tools enable you to change the layout of any grid.
Run Notification Job 
On selecting one of the notification types this button can be pressed to call the program /BTI/AUT_NOTIFICATION_ENGINE and as a test trigger the one off sending of the notification to SAP connect.
SAPconnect 
Directs you to the SAPconnect transaction SOSA which displays requests that are being sent, or have already been sent by using SAPconnect, according to the selection criteria
Web Repository 
Directs you to the SAP standard transaction SMW0 to view the templates for the notifications
Note that double clicking a Notification Type will display the Notification Schedules with further details as below:
Notification Schedules
The Notification Schedules are displayed as below. Each one has the following fields:
- Type can be standard as supplied with Testimony or custom which is a customised version. The standard version can’t be used so you will need create your own custom versions to operate with Testimony.
- Status can either be inactive which means that the notifications won’t be sent or active which means is should be operating. Note that you can’t activate the standard template supplied: it is provided as a template to copy.
- Medium is how the notifications are supplied. Only email notifications are available at present.
- Period is only shown for regular Notification Types to show how frequently these will be sent while the activity is running.
- Filters shows the groups that will receive this notification and this can be restricted by plans, roles and users.
- Last Run Date/Time is simply the last time that the notification was run.

The Notification Schedule has the following actions:
Refresh
This allows a simple refresh of the grid to update any changes.
Grid Tools
The grid tools enable you to change the layout of any grid.
Create 
Enables the user to create a new Notification Schedule based on the Notification Type. Only custom notification schedules can be created.
Change 
Enables the user to change the selected Notification Schedule. The schedule’s name, period and whether or not it is active can be changed.
Display 
Simply displays the selected Notification Schedule.
Delete 
Simply deletes the selected Notification Schedule. Note: don’t delete the standard one as then it won’t be available to copy in the future.
Copy 
The recommended method to create a new schedule is to select the standard template provided and press the copy button.
Activate 
Select a custom Notification Schedule press the activate button then press the refresh button . The custom Notification Schedule should now be active as below. If a schedule is inactive it won’t be triggered and none of its notifications will be sent out.

Deactivate 
Select a custom Notification Schedule press the deactivate button then press the refresh button . The custom Notification Schedule should now be inactive. No further notifications will now be sent out for this schedule.
Test Plans 
Notifications can be configured just for one Test Plan or all plans. Pressing the right hand side of button reveals the options to select all Test Plans or select an individual Test Plan as below. Note it is possible to select more than one test plan if required.

Roles 
Notifications can be configured to be sent to certain user roles. Pressing the right hand side of button reveals the roles that can be selected as below. Note it is possible to select more than one role if required.

Users 
Notifications can be configured to be sent to specific users. Pressing the right hand side of button reveals all the users that can be selected as below. Note it is possible to select more than one user if required.

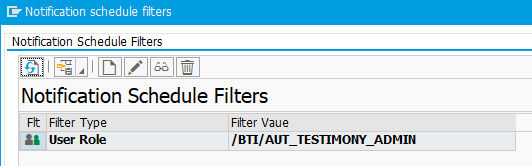
Filters 
Filters can be used to check who the notification will be sent to. Select a custom Notification Schedule and press the filter button . The example below shows that any user with the Testimony Administration role will receive this notification. Using the delete option here is the best way to remove part of a filter. Options are available here to create or change filters, however, it is recommended that the Test Plan, Roles and User options are used to do this as above.
Set Last Run Date/Time 
The ability to set the last run date and time if required.
Run Notification Job
On selecting a notification schedule this button can be pressed to call the program /BTI/AUT_NOTIFICATION_ENGINE and as a test trigger the one off sending of the notification to SAP connect.
Post your comment on this topic.