
Quick Start/Tutorial 3 Video
Here is a (5 minute) video that goes through all the steps listed bellow:
Identify Another New Test Case
Lets generate another new test case where we will have to put a scripted Action to achieve our testing objective.
- Open Browser and navigate to www.amazon.com
- Search for ‘Star Wars blu ray’
- (new action) Check the ’1970 – 1979’ check box for ‘Movie & TV Show Release Decade’
- Select first item that appeared by index
- Add the item to cart
- Verify item was added to cart
Add New Action
In order to work with ‘check box’ controls for ‘Movie & TV Show Release Decade’ we’ll need to create a new action. The actual controls in amazon are not check boxes (they are links that render differently based on click) and because of that this is a good opportunity to show how to create a fully scripted action.
First, lets create a script for our new action:
- Click on Scripts tab
- Expand ‘src’ folder in left pane
- Right click on ‘actions’ folder and select New -> Java Action
- Type in ‘CheckMovieTVReleaseDecade.java’ and click OK
- Type in the code to handle the check box part of amazon page (copy/paste the code example bellow to replace the template code that appears):
package actions; import actions.selenium.Browser; import org.openqa.selenium.*; import org.openqa.selenium.support.ui.Select; import java.util.*; public class CheckMovieTVReleaseDecade { public void run(HashMap<String, Object> params) { WebElement element = Browser.Driver.findElement(By.xpath("//*[@id='leftNavContainer']//SPAN[text()=\""+params.get("Date range value")+"\"]/../../INPUT")); if((Boolean)params.get("Check") && (element.getAttribute("value").contains("false"))){ element.click(); } else if (!(Boolean)params.get("Check")&& element.getAttribute("value").contains("true")){ element.click(); } try{Thread.sleep(4000);}catch(InterruptedException e){} } } - Click on Build Scripts button (grey button with downward arrow) to make sure it compiles correctly and there are no errors
- Click on Save and then click on Git Push (computer with green arrow button) and then OK to push the code we just created to main branch. We will discuss more about Git in Quick Start 4.
Now lets create an Action definition to be used by Test Case(s):
- Click on Actions tab
- Click on New Action button
- Type in ‘Check/Uncheck the Movie & TV Show Release Decade checkbox’ for name field
- Keep ‘Script’ selected since this is going to be a scripted action
- For ‘Tags’ field, type in ‘amazon’ and press enter
- Add 2 parameters with the name exactly as they appear in the code we developed:
- Name first one ‘Check’ and specify Parameter Type for it as ‘Boolean’
- Name second one ‘Date range value’ - For ‘Select Script’ field point to our class method we just created by typing in: actions.CheckMovieTVReleaseDecade.run
- Alternatively you could have used script picker (a looking glass icon button to the right of Select Script field) to select the method. - Now that we are happy with our action, for ‘Status’ drop down (bellow Description text field) select value ‘Automated’
- Click on Save button and you should see your new action looking like this:
![]()

Clone Test Case
Since this test case looks very similar to the ‘Add Star Trek to Cart’ lets clone it and add the new action step we just created.
- Click on Test Cases tab
- Double click on ‘Add Star Trek to Cart’ test case to open it
- Click on Clone button (to the right of Delete one)
- Type in name ‘Add Star Wars to Cart’ and click OK
- In a left pane click on Actions or Actions Tree and locate our new action called ‘Check/Uncheck the Movie & TV Show Release Decade checkbox’
- Drag and drop our new action between Search Amazon and Select Item actions
- Type in the following values for the new action:
- Check = TRUE
- Date range value = 1970 – 1979 - For ‘Search Amazon’ action modify it to the following values:
- search for = Star Wars Blu Ray - Since we are expecting to have a lot of test cases to be executed, lets make this more compatible with that idea by specifying ‘After State’ (expand top portion of ‘Test Case Details’ by clicking on little triangle button first) by typing in ‘Close Current Window’ in that field and selecting it when it appears and press Enter to add it to After State action collection (or just drag and drop it there). What will happen is whatever action specified in that field for that test case will get executed after test case has finished running (and in our case it will close current browser window so if we execute 100 test cases we wouldn’t have 100 browsers opened at the end)
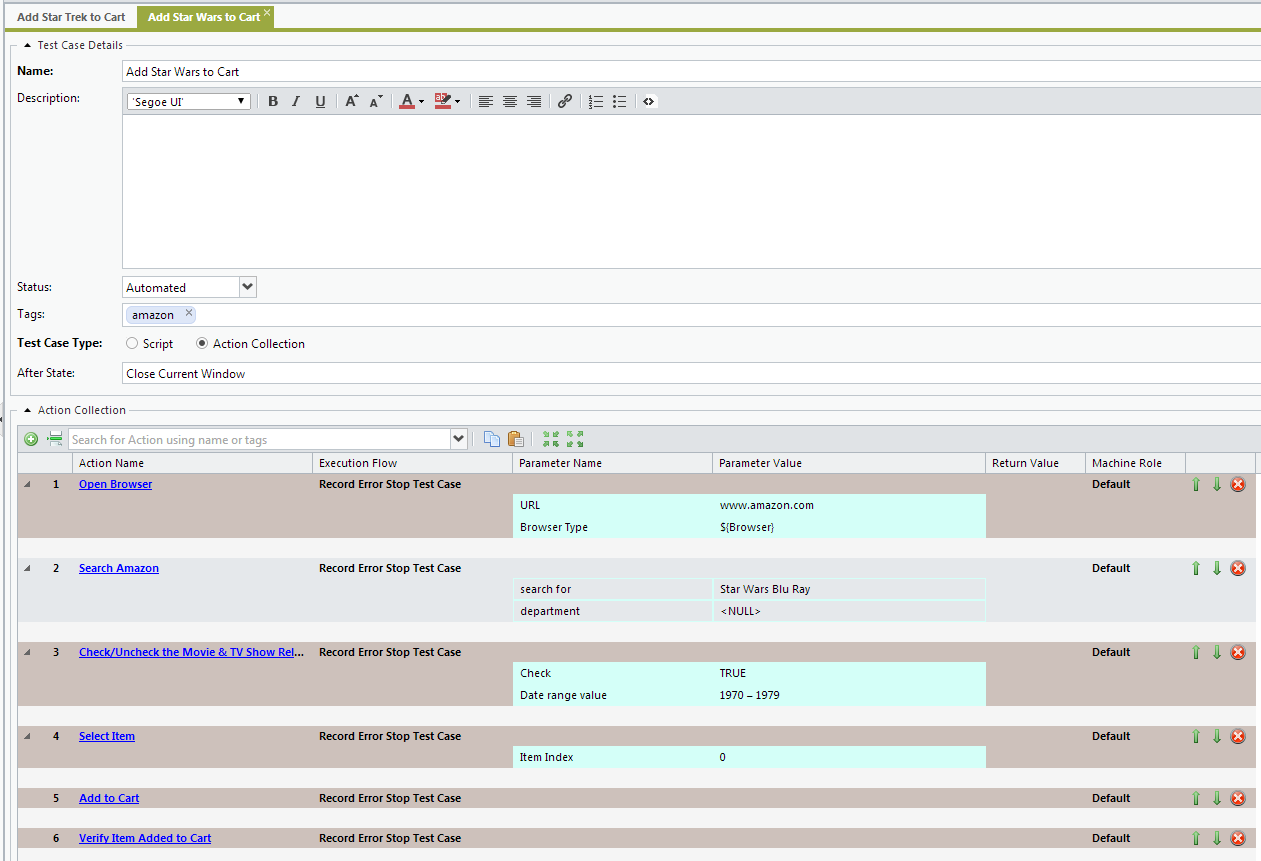
- Click on Save and you should see your test case looking like this:
![]()
New Execution
Lets create a new Execution and use the existing Test Set where you will specify a new test case that was just created.
- Click on Execution tab
- In left pane click on ‘Test Sets’
- Click on Edit button for ‘Amazon Shopping’ test set (or double click on it)
- Expand ‘amazon’ tag and check the checkbox for ‘Add Star Wars to Cart’ (or uncheck and then check ‘amazon’ check box which will now check all test cases which belong to that tag)
- Click on Save and click on Yes in message box
- In left pane click on ‘Executions’
- Under ‘All Executions’ click on ‘New Execution’ button
- Type in Name ‘New Amazon Execution’ and for Test Set set it to ‘Amazon Shopping’
- Expand ‘Settings’ by clicking on little triangle button next to name
- Check the checkbox for ‘No After State’ so that browser wont close for this run and we can see it open after test is done for now (for official test case runs you want this unchecked)
- Click on Save button
- Expand ‘Set Variables’ by clicking on little triangle button next to name
- For ‘Browser’ under ‘Set Variables’ select the browser you want to run the test cases against by clicking on the Value field for it (which should have ‘Firefox’ by default) and click on drop down arrow to specify other browser (Internet Explorer or Chrome)
- Under ‘Select Machines’ check the check box for ’127.0.0.1’ (agent was installed with RedwoodHQ server)
- Under ‘Test Cases’ check the check box for our new test case ‘Add Star Wars to Cart’
- Click on ‘Run Selected Execution’ green arrow button on top
- Test case will now run and then when it’s done the test case will have status of ‘Finished’ with result ‘Passed’
Post your comment on this topic.
PrimaTest wrote: Mar 26, 2017
You cannot clone an execution, but there are only 2 fields there that you set: Name and Test Set.
You can also specify default execution variable values (on execution creation) by specifying them in Variables page.
Vipul wrote: Mar 23, 2017
Is there any way to clone the test execution?