In previous versions of Social Squared, when you wanted to include an image into your post or reply to a post, you had to already have the image loaded on the web somewhere or upload the image to a SharePoint® library. In either case you had to know the URL of the image. Then using the URL, you were able to insert the image into your post. Either way, it wasn’t the best experience.
Inserting an image is now easier. From Social Squared version 3.0.0.2, the Insert Image functionality has been extended. Now when you click on the insert image icon 
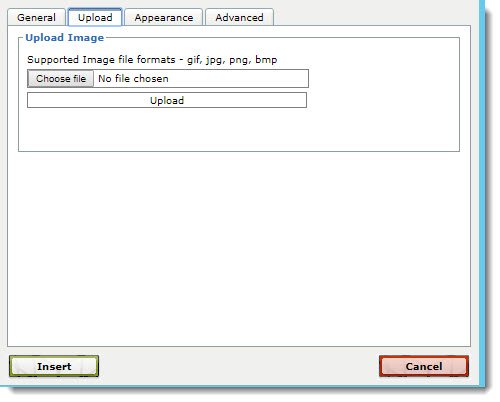
The Insert/edit image dialog box contains four tabs: General, Upload, Appearance and Advanced, which are described below. Once you have provided the necessary information click Insert. If you are editing a previously inserted image, then the text of the button is Update and not Insert. A link to the image is provided at the bottom of the post.
General
Use the General tab to specify the Image URL, Image description and Title. You will see a preview of the image in the Preview box. If the image is not uploaded to the web, then use the Upload tab. For accessibility reasons, you should provide the text for both the Title, which appears when a user moves their cursor over the image, and Image description, which is assigned to the alt attribute that is displayed if the image can not be displayed, which is used by screen readers.
Upload
To upload an image, click Choose file, select the image you want to use, and then click Upload. When the image has been uploaded a message in red text appears below the Upload button, Image has been uploaded, please click on the General tab to preview your image. A link to the uploaded image is displayed at the bottom of the post as a file attachment.
Supported image file formats are: gif, jpg, png and bmp. If you try to upload an unsupported image file format a message in red text appears below the Upload button, Not supported Image file format.
Appearance
On this tab you can configure how the image is displayed within the post using the following options:
- Alignment. From the drop down list, select, Not Set, Baseline, Top, Middle, Bottom, Text top, Text bottom, Left or Right. This is equivalent to using vertical-align CSS property.
- Dimensions. Use the two text boxes to control the height and width of the image in pixels. If no values are typed into the boxes then the image is rendered using the dimension of the original image. Ideally you should not use these text boxes to constrain the dimensions of the image when rendered in the browser – the size of the image should be changed before uploading it to the web, using Paint, iPhoto®, Microsoft® Office Picture Manager, Photoshop®, other third party image editing tools or free online web sites. If you’re unsure of the dimensions of your image, before you upload your image, right-click on the image file, click Properties and then on the Details tab you should see the dimensions of the picture.
- Constrain proportions. Select this check box, when you want the proportion of the height when compared to the width remains that same as those in the image file.
- Vertical space. This specifies the whitespace that appears above and below the image, and is equivalent to using the margin-top and margin-bottom CSS properties.
- Horizontal space. This specifies the whitespace to the right and left of the image, and is equivalent to using margin-left and margin-right CSS properties.
- Border. Use this option to configure a solid black border around your image. Type the width of the border in pixels for the border to appear. When no value is typed in the text box, no border is displayed around the image.
- Style. As you specify the previous options, in the Style text bottom you will see the CSS properties that the options translate too. If you know CSS you can type CSS properties in this text box.
Advanced
Use the Advanced tab to configure the following options:
- Swap image. You can specify an alternative image when a user’s moves their cursor over the image and / or when a user moves away from the image. You must previously upload the mouse over and mouse out images, and then specify the URL of the images in the text boxes.
- Id. In this text box, specify a unique identifier for the image.
- Language direction. From the drop down list you can select, Not Set, Left to right or Right to left. This specifies the text direction/writing direction.
- Image map. Use this text box to specify an image map, which is a list of coordinates relating to the image, which when clicked directs the user to different web destinations. Image maps provide an easy way of linking various parts of an image to hyperlinks, without the need to divide the image into separate image files.
- Long description link.


Post your comment on this topic.