“Move an account’s permissions to another account”
DeliverPoint allows you to select a scope, copy the permission set of an account (source) within that scope to other account(s) (target), and then the source account is deleted within the selected scope. This operation is a combination of the Copy Permissions and Delete Permissions commands.
To use the Transfer Permissions command, complete one of the following three methods:
Method #1
- Navigate to the DeliverPoint dashboard and using the View Ribbon tab, select either the Farm Centric or Account Centric.
- In the tree view, select those nodes, also known as SharePoint objects, to be included in the scope, for example, one or more site collections, sites or an accounts. The properties of the node selected are displayed in the dashboard’s Properties pane.
Note: Child nodes are not automatically included. - On the Commands Ribbon tab, click Transfer Permissions in the Account Management group.
Method #2
- Navigate to the list or library that you want to use as the source for your transfer permission.
- On the DeliverPoint Ribbon tab, click Transfer Permissions in the List Permissions group.
Method #3
- Navigate to the list or library that contain list items/files whose permission setting you want to use as the source for your transfer permission.
- On the DeliverPoint Ribbon tab, click Transfer Permissions in the Item Permissions group.
The Transfer Permissions page is displayed. The nodes included in the scope are displayed to the right of the page title.
Complete information in the following sections to complete the Transfer Permissions operation. You may need to scroll down to see all the sections:
- Transfer Permissions From. Use this section to identify the source usernames, groups or email address of the account (source) you wish to use as a basis for the transfer operation. The source account is the account from which the permissions are to be copied from, and the account to be subsequently deleted.
- From the drop down list, select either User or Domain Group or SharePoint Group.
- When User or Domain Group is selected, you can use either:
- The Browse
icon to select the source username/ Active Directory groups, or
- In the people picker text box, type usernames, groups or email address separated by a semi colon ( ; ), and then click the Check Names
icon to verify that you have typed valid usernames.
- The Browse
- When SharePoint Group is selected you can use the Browse
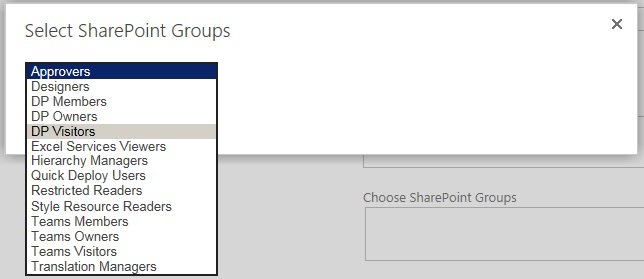
icon to display the Select SharePoint Groups dialog.
- Select a SharePoint Group from the drop down list.
- Click OK to close the dialog.
- Select a SharePoint Group from the drop down list.
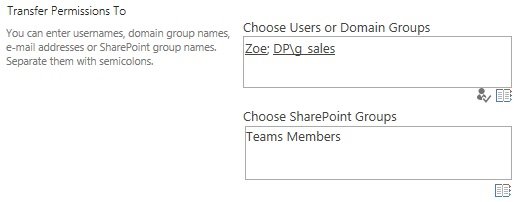
- Transfer Permissions To. Use this section to identify one or more the target usernames, Active Directory groups, SharePoint Groups or email address or a combination. The target account(s) is the account to whom the permissions will be copied to. DeliverPoint 2013 allows multiple target accounts to be added in one job. You can use either:
- The Browse
icon to select the target username/groups, or
- In the people picker text box, type usernames, Active Directory groups or email address separated by a semi colon ( ; ), and then click the Check Names
icon to verify that you have typed valid usernames.
- Job Processing. Select one of the transaction types: Run Now, Run Later or Both. This option determines when the job will be processed. The default setting is Both.
- Options. Select or deselect the following check boxes.
- Alerts. According to the permissions of the current user, alerts can be chosen to be included or not. For more information, see Security Trimming.
- Process Subwebs. To include subsites in the operation.
- Process Lists. To include Lists in the operation.
- Process List/Folder Items. To include list/folder items in the operation.
- Support Rollback. Provides option to rollback changes on Job Details page upon completion of original operation.
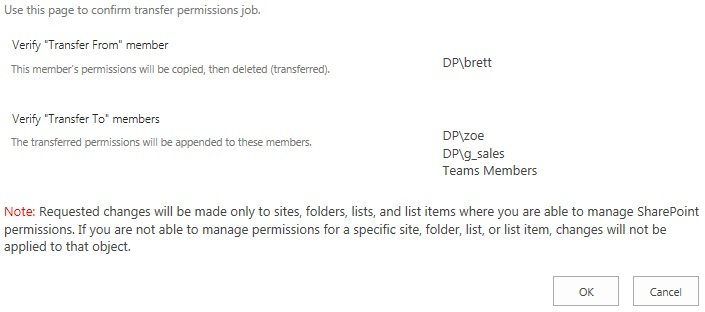
- Click Next to display the confirmation screen.
- Review and then click OK.
The Transfer Permissions page is displayed stating that the DeliverPoint jobs have been successfully created. This page does not mean that the Transfer Permissions DeliverPoint command is complete. If you choose Both, for the Transaction Type, then two jobs will be created a Run Now and a Run Later job. The Transfer Permissions command will not be complete until the related DeliverPoint job(s) are completed. - Click Return to display the Transfer Permissions page, or click Job Status to display the DeliverPoint Job Status and History page, which you can use to monitor when the two DeliverPoint jobs are completed.


Post your comment on this topic.